How to Create a Customer Portal In 5 Easy Steps
In today’s digital world, seamless communication and efficient management of client relationships are more than just a convenience—they're a necessity. This is where the concept of a customer portal comes into play, acting as a vital bridge between businesses and their clients. But what exactly is a customer portal, and why has it become an indispensable tool in the modern business landscape?
Before diving into the world of customer portals, let's preview the key topics we'll cover in this article. Here’s our table of contents guiding you through each important aspect we're going to explore;
- What is a Customer Portal?
- 8 Key Elements & Features Every Customer Portal Needs
- Top 5 Advantages of Having a Customer Portal
- How to Create a Customer Portal in Just 5 Steps
- Identify goals and purpose
- Select a co-code portal builder for your business needs
- Customize your customer portals in just 3 min
- Integrate with your apps
- Connect your customer portal with your website
What is a Customer Portal?
A customer portal, also known as client portal or web portal, is an online platform that provides your clients with a personalized, secure, and centralized space to interact with your services or products. It's like having a dedicated digital assistant for each client, streamlining processes, and enhancing the overall user experience.
Imagine a law firm providing a portal where clients can securely upload confidential documents, schedule appointments, and communicate with their attorney—all in one place. Or picture an IT service provider where clients can track their service requests, view updates, and access support resources effortlessly.
By integrating various functionalities such as secure file uploads, easy communication through messaging and group chats, white labeling options, task management, file approvals, client onboarding tools and calendar scheduling, customer portals not only simplify but also enrich the client-business relationship.
Plus, these platforms can be effortlessly connected with popular website builders like WordPress, Webflow, Squarespace, or Wix, making them an accessible option for businesses of all sizes.
8 Key Elements & Features Every Customer Portal Needs
In sculpting your customer portal, certain features stand out as essential, each serving as a cog in the machinery of seamless client-business interaction. Here's what to include:
- White Labeling Option: Customize the portal with your brand's look and feel, making it a true extension of your business identity and top-notch client onboarding experience.
- Secure File Uploads: Offer a safe harbor for clients to share and store sensitive business documents, ensuring peace of mind with top-notch security.
- Easy Communication: Incorporate messaging and group chats, fostering a dynamic environment for instant and effective client communication.
- Integrations: Seamlessly connect your portal with popular tools like WordPress, Google Workspace, Adobe Sign, DocuSign, JotForm, Zapier, Integrately, Single Sign On (SSO), Google Calendar, Dropbox, Zoom, GoToMeeting, and Google Sheets, ensuring smooth interoperability and user experience.
- Task Management: Integrate tools for task assignment and tracking, turning the portal into a hub of productivity and collaboration.
- File Approvals: Streamline processes with a system for clients to review and approve documents, bringing efficiency to your workflow.
- Calendars for Scheduling: Incorporate calendars to manage deadlines and events, keeping everyone on the same page.
- Notifications: Ensure that no update goes unnoticed with real-time notifications, keeping the communication loop active and informed.
Top 5 Advantages of Having a Customer Portal
Why invest in a customer portal? The benefits are multifaceted and compelling:
- Centralized Hub: It consolidates all client and business activities, from document sharing to communication, serving as a single source of truth, making access to essential information and services a breeze.
- Enhanced Security: Offers top-notch security for file sharing, safeguarding sensitive data and client information.
- Personalized Client Experience: Tailors experiences for each client, fostering trust and improving overall user satisfaction.
- Brand Identity Boost: A well-designed portal reinforces and elevates your brand's presence and perception.
- User-Friendly for All: You don't need to be a tech expert. Many web portal providers offer around-the-clock support, making management and navigation effortless.
How to Create a Client Portal in Just 5 Steps
1. Identify goals and purpose
The goals and purpose of your customer portal must be aligned with the specific needs of your business sector and clientele.
For instance, a law firm might develop a portal to streamline the exchange of legal documents, schedule confidential consultations, and facilitate secure communications between clients and attorneys. This targeted approach ensures that the portal addresses the unique needs of legal clients, such as privacy and easy access to case information.
In healthcare, a hospital's portal might be designed as a digital health hub, allowing patients to access medical records, book appointments, and receive test results, focusing on enhancing patient engagement and streamlining access to health information.
Similarly, for an accounting firm, the customer portal's purpose could be geared towards offering a centralized platform for clients to manage their financial engagements. This might include features like tracking the progress of tax filings, scheduling appointments with accountants, or receiving alerts about important financial deadlines and updates.
The key here is to create a portal that simplifies financial management and communication, thereby enhancing the client experience in the accounting sector.
2. Select a no-code portal builder for your business needs
Developing a client portal can be a heavy task, requiring careful planning and execution. When it comes to building your customer portal, selecting the right no-code portal builder is a pivotal decision.
No-code platforms like Clinked simplify this complex process, allowing you to create a robust and secure white label client portal without needing in-depth coding knowledge.
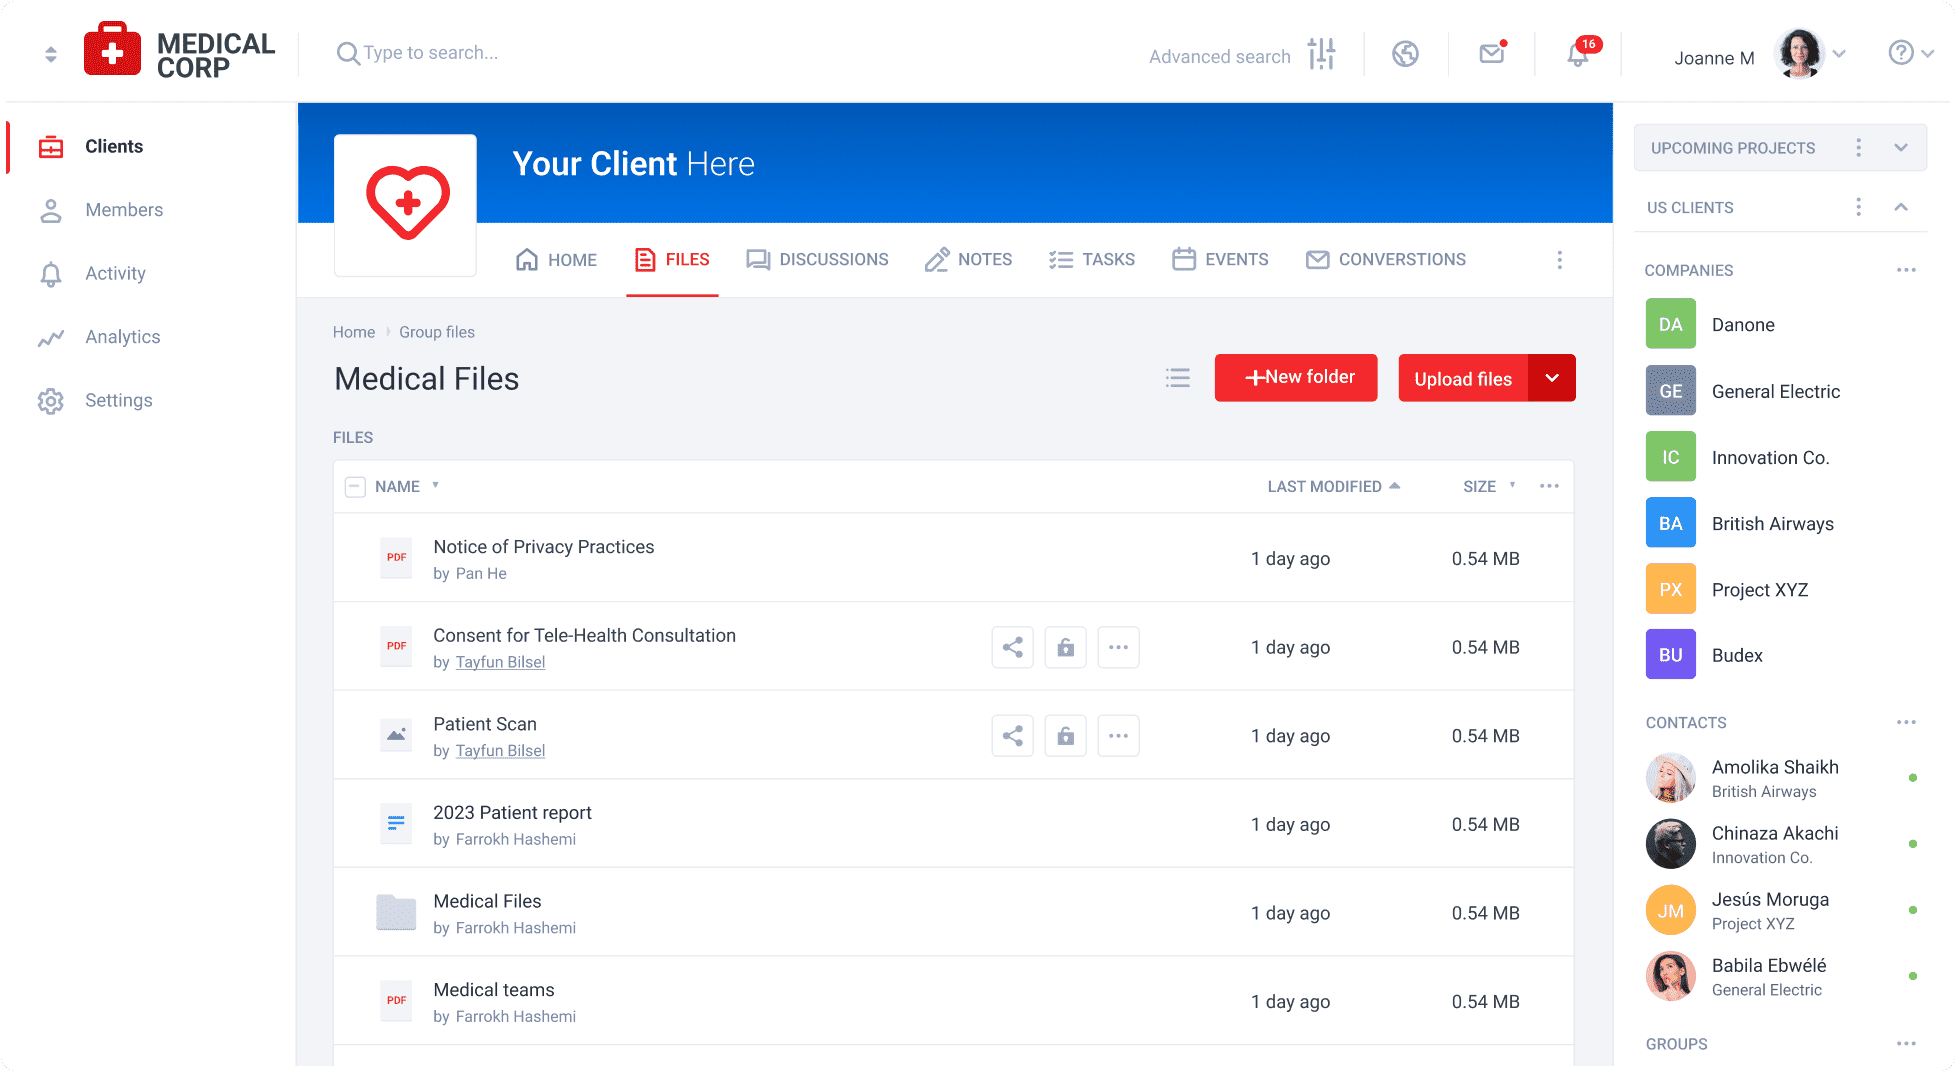
Businesses can create a custom, branded space for efficient client collaboration. With features like secure file sharing and cloud-based document storage, paired with bank-level security measures, Clinked ensures that your sensitive business communications remain confidential and easily accessible.
Setting up a portal with Clinked is refreshingly straightforward, catering to those who may not be tech-savvy. The platform simplifies the process of creating a personalized and secure space for client interactions, making it an ideal choice for businesses aiming to enhance their digital presence and streamline their operations.
To gain a deeper understanding of Clinked's capabilities, don't miss the concise yet informative video below; it's the perfect resource to familiarize yourself with what Clinked has to offer.
3. Customize your customer portals in just 3 min
Customizing your client portal is a key step in creating a platform that not only meets your operational needs but also resonates with your brand identity. This stage involves tailoring the aesthetic elements, such as the color scheme, logos, and layout, to align with your company's branding.
Quick tip: A logo generator like this one can be a helpful tool for creating custom logos that fit your brand identity.
It's also about personalizing the user experience to ensure it addresses the specific requirements of your clients. This could mean configuring the dashboard to highlight the most used features, or setting up specific workflows that mirror your business processes. The goal is to create a portal that is not only functional but also a visual and interactive extension of your business, enhancing user engagement and satisfaction.
Here’s how you can set up your Clinked account in a few easy steps;
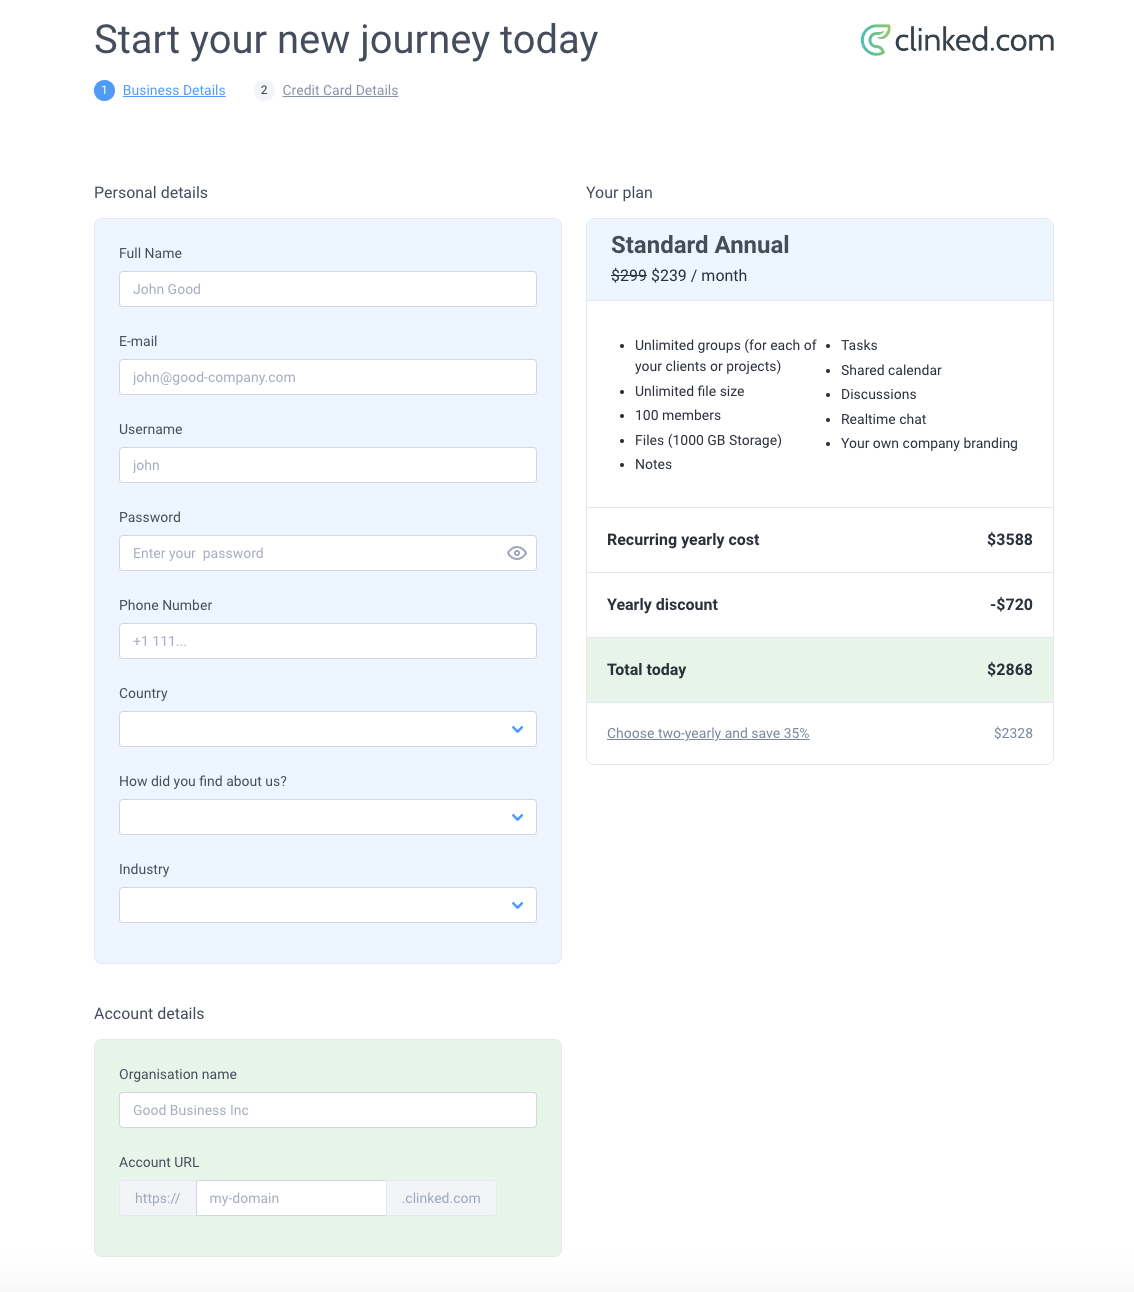
- Set Up Your Clinked Account: Begin by creating your account on Clinked. This process is quick and gives you instant access to the platform.
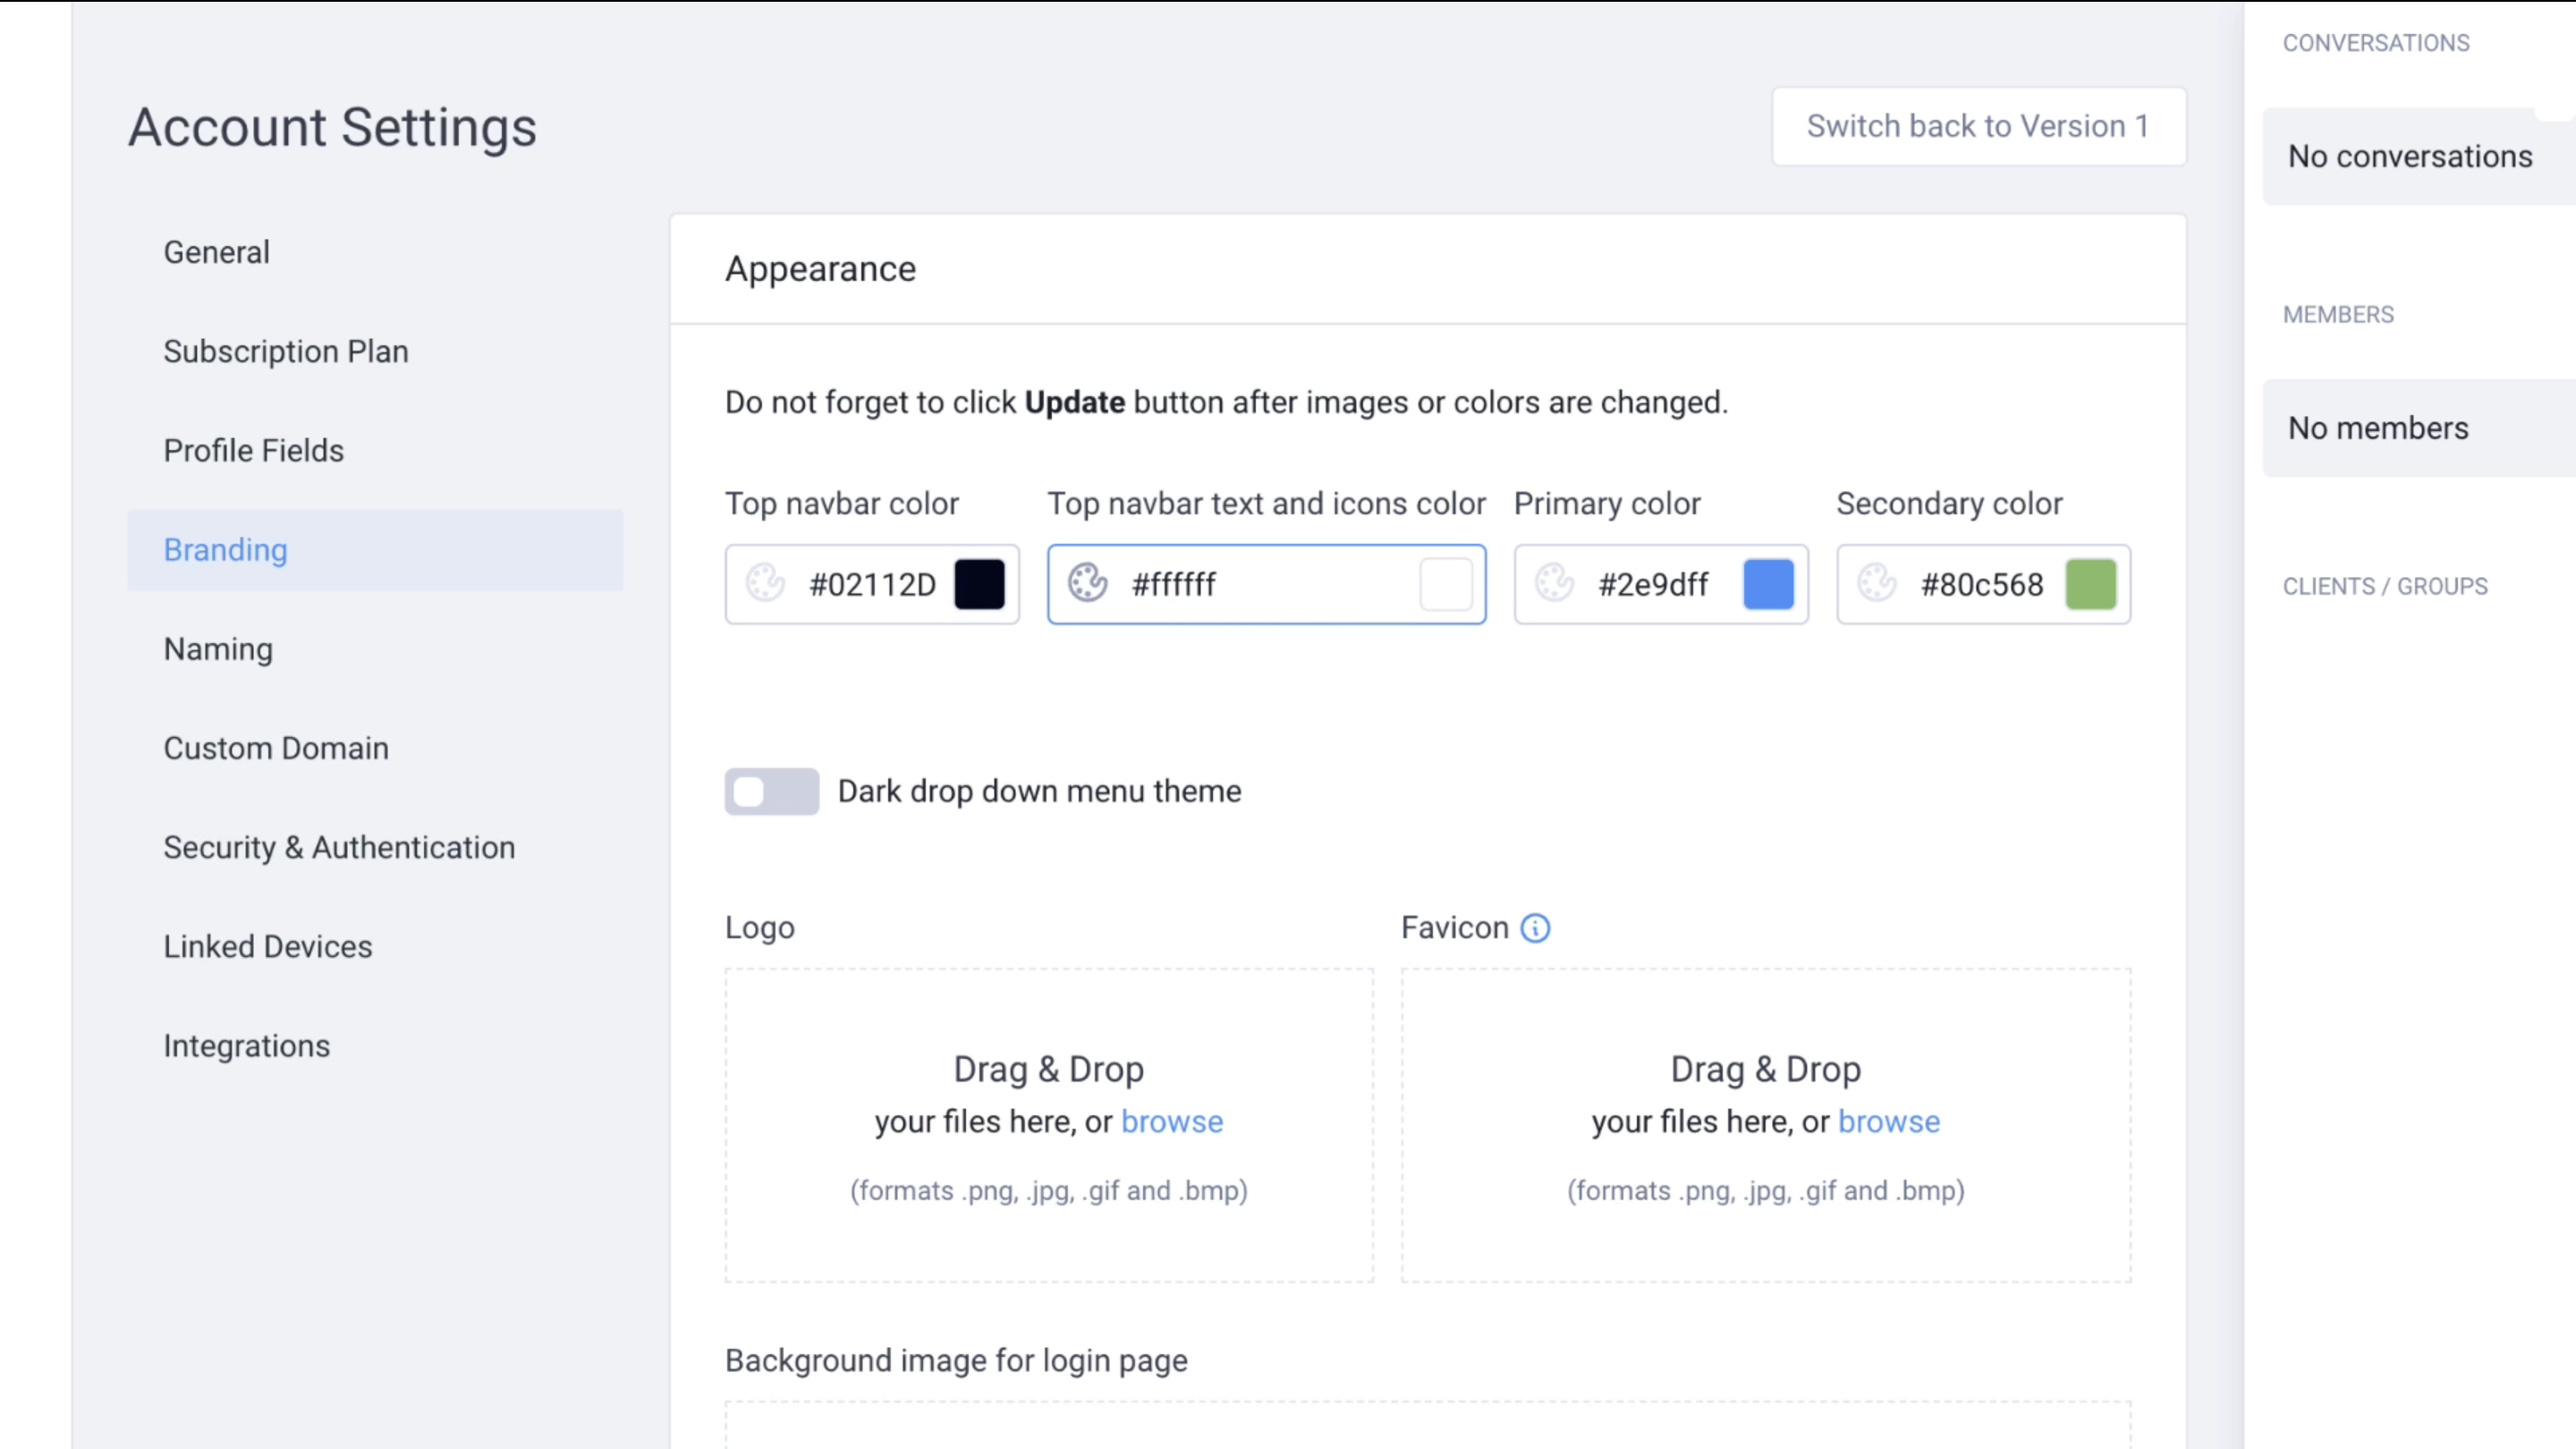
- Customize to Match Your Branding: Personalize your portal with your company's branding. Upload your logo, choose a suitable header image, and select a color scheme that reflects your brand identity.
- Create Client-Specific Groups: Once your portal reflects your brand, start creating groups. Tailor each group to cater to the specific needs of your individual clients.

- Add and Invite Clients: Add your team members and clients to the portal. Utilize Clinked's feature to set user permissions, determining who has access to different groups, assets, and functionalities.

Now you can sit back and revel in the convenience and efficiency it brings to your client interactions. Enjoy the seamless collaboration, enhanced communication, and streamlined business processes that your personalized and integrated portal offers. Your journey to digital transformation is now complete, and your portal is ready to elevate your client engagement to new heights.
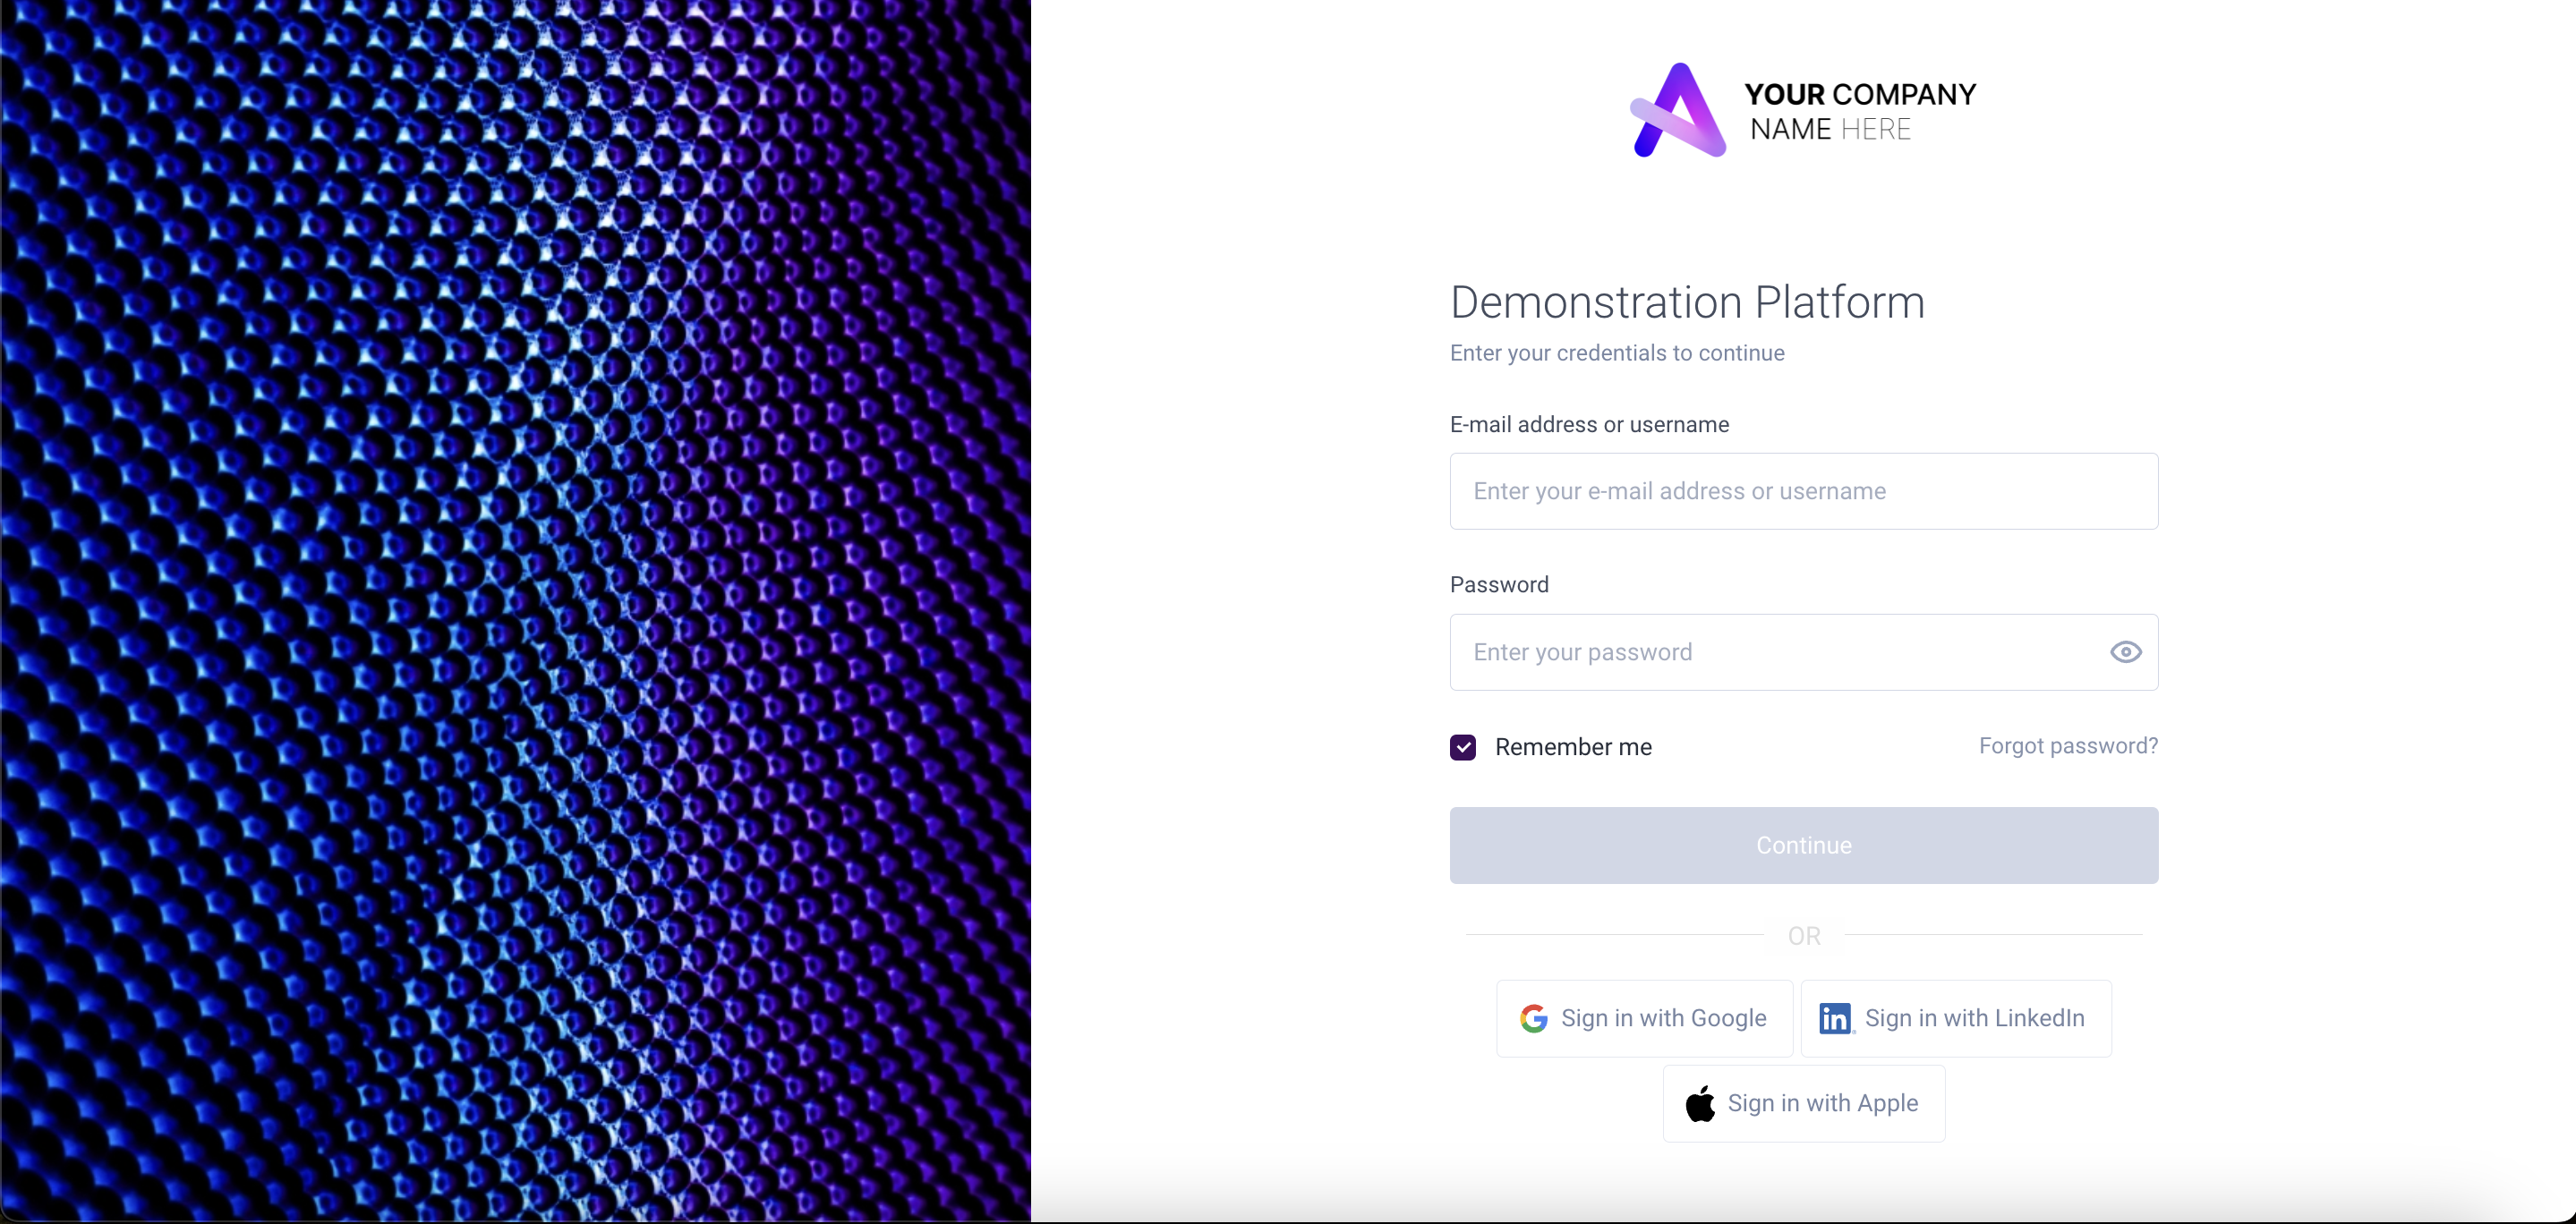
If you want to learn more about how you can set up your account on Clinked and create your custom portal, check out the video tutorial below.
4. Integrate with your apps
Clinked enhances its functionality with a diverse range of integrations, allowing you to connect with many of the tools you already use. This feature enriches your customer portal by enabling seamless workflow and data synchronization. Some notable integrations include:
- Google Workspace
- Adobe Sign
- DocuSign
- JotForm
- Zapier
- Integrately
- Single Sign On (SSO)
- Google Calendar
- Dropbox
- Zoom
- GoToMeeting
- Google Sheets
These integrations, ranging from document signing to video conferencing and cloud storage, ensure that your client portal is not only comprehensive but also highly adaptable to various business needs.
After meticulously following these steps to create your customer portal, you can now sit back and revel in the convenience and efficiency it brings to your client interactions. Enjoy the seamless collaboration, enhanced communication, and streamlined business processes that your personalized and integrated portal offers. Your journey to digital transformation is now complete, and your portal is ready to elevate your client engagement to new heights.
5. Connect your customer portal with your website
An essential step in maximizing your customer portal's effectiveness is integrating it with your existing website, regardless of the platform you're using, be it WordPress, Squarespace, Wix, Webflow, or other web solutions. This integration creates a seamless experience for your clients, allowing them to navigate easily between your website and the portal.
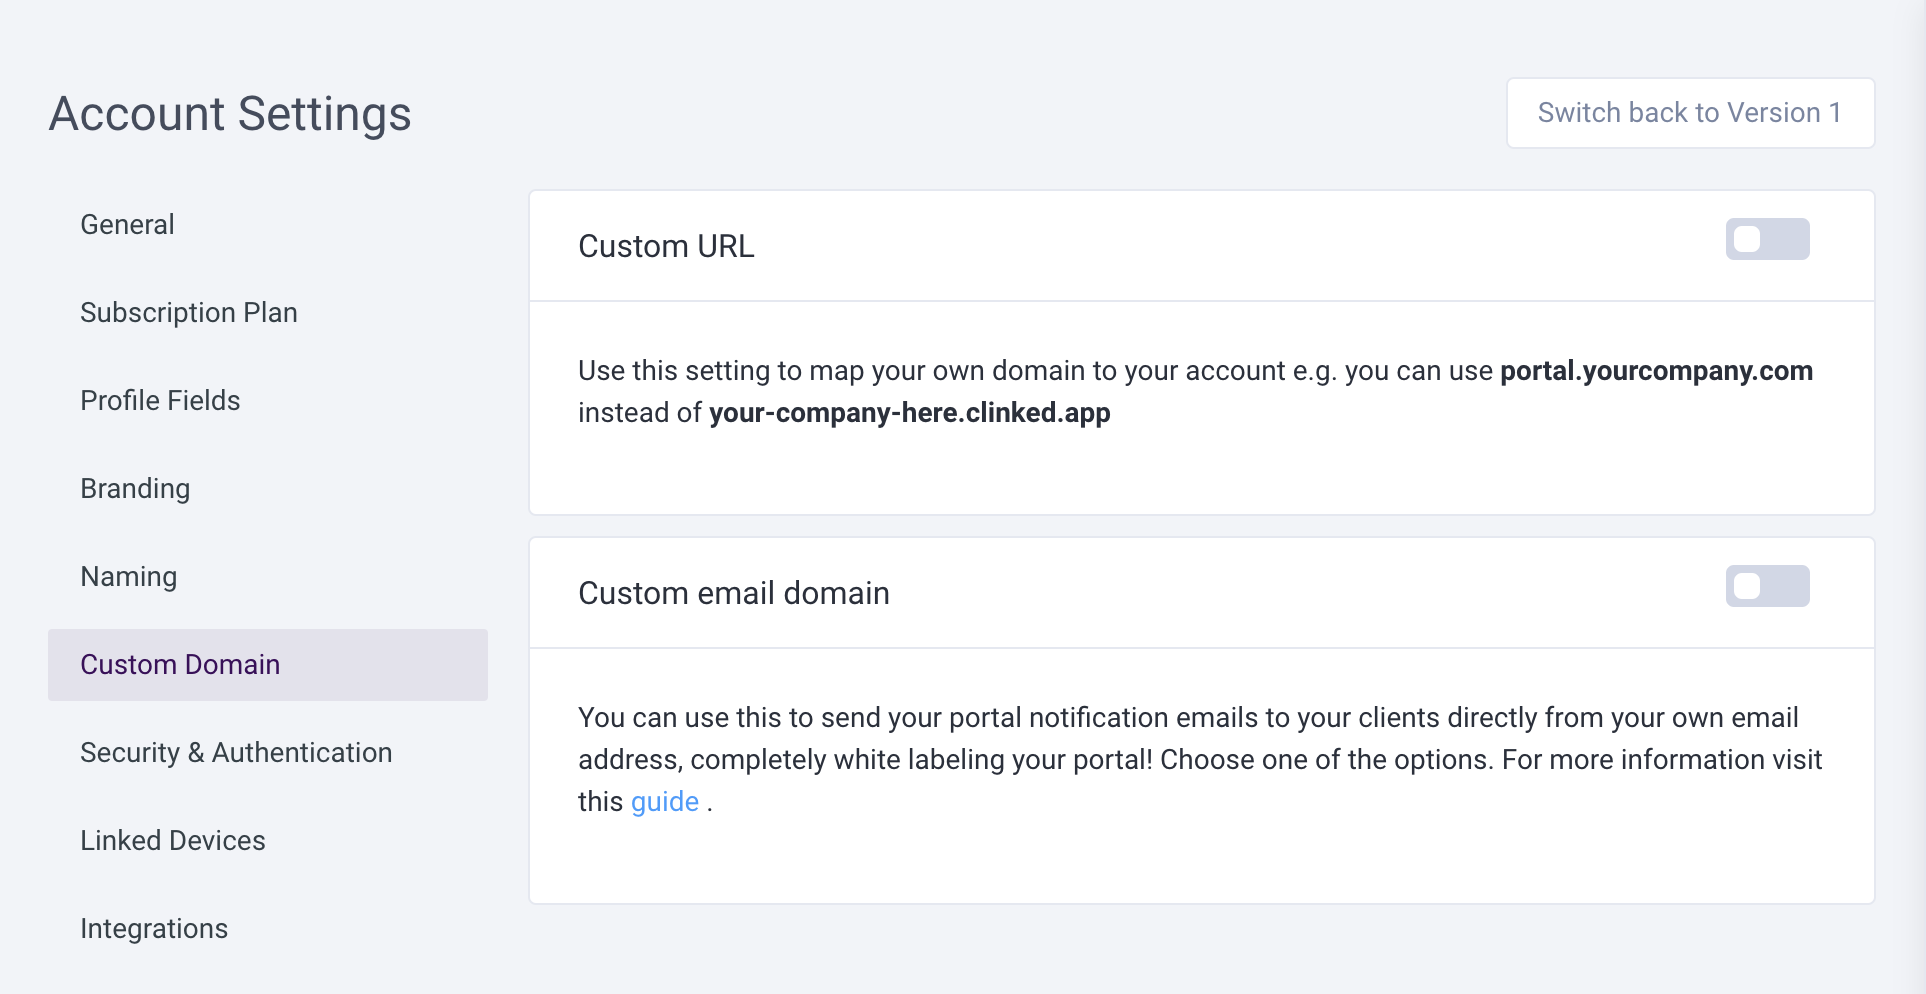
Additionally, you can enhance your brand's professional appearance by setting up a custom domain for your portal, such as portal.companyname.com. This not only reinforces your brand identity but also provides a cohesive and streamlined online presence for your business and its clients.
Wrapping-Up
In wrapping up, the search for an effective client portal can be daunting, especially with the constraints and limitations of many available options. For those seeking a custom client portal that integrates effortlessly with various websites and requires no coding expertise, Clinked is a noteworthy solution.
Its versatility, exceptional client CRM, and extensive portal features make it a strong candidate for any business looking to enhance its digital client interaction. Exploring Clinked, starting with its free trial, could be a valuable step towards finding the perfect client portal tailored to your unique business needs.
To truly understand the potential of Clinked in elevating your client interactions, we invite you to book a demo. This will give you a firsthand look at how its features and integrations can seamlessly align with your business needs.
Read More: